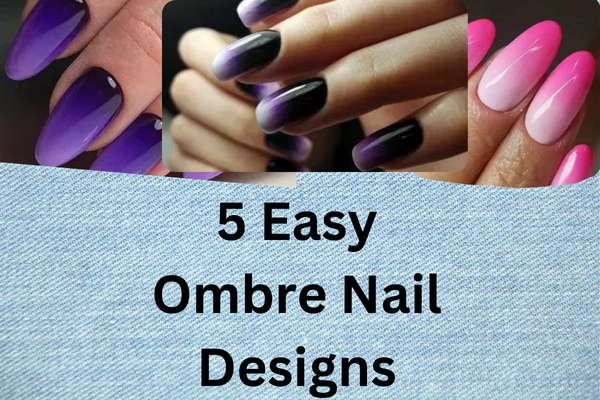
Ombre nails have recently become quite trendy and are a perfect, easy way to try a new look. But if you’re looking for some quick ideas on how to master the style, worry no more! These five nail designs below are guaranteed to hit any party.
What is an ombre effect, and how is it used in ombre nails?
An ombre effect is created when a dark color is gradually lightened toward the end of the nail. You can achieve this look with any color, but it works best with shades that are close to one another.
An ombre effect is a style in which the color of one shade transitions into the next gradually. This can be achieved with various nail polishes and tools, including brushes and pens. It’s easy to do at home, and you can create any look you want. Here are some easy ombre nail designs to get started:
1. Begin by painting your nails with one light color. Let it dry completely before moving on to the next color.
2. Paint your nails with the second light color, then let them dry completely before moving on to the next shade.
3. Paint your nails with the third light color, then let them dry completely before moving on to the next shade.
4. Repeat steps 2-3 until all colors are used. Finish by polishing your nails with a clear top coat
How to start ombre nails?
If you’re looking for a no-fail way to add some flirty ombre tips to your nail art repertoire, this tutorial is perfect! In just four easy steps, you’ll be able to create gorgeous ombre nails using just a few basic supplies. First, apply two coats of your favorite color, basecoat, to your nails. Then use your lightest color, plus one more layer, to create the gradual build of the ombre. Add a final coat of topcoat to seal in the design, and you’re ready to go! These easy tips can be tailored to any style or look – so there’s no limit on how beautiful and unique your ombre nails can look!
Different types of ombre designs
There are a few different types of ombre nail designs that you can create with minimal effort. You can use two shades of the same color to create a gradient look. Or three or more different shades to create an intricate and mysterious ombre design.
1. Faded Gradient Ombre: Start by painting your nails with one light shade of the color you want to fade. Then paint over it with a second darker shade. Repeat these steps until all your nails are done.
2. Watermelon Sundae Ombre: start with two light peach tones and two dark pink tones, then blend them using a dotting tool to create the fading effect.
3. French Tip Ombre: Paint each nail with a different color, starting at the base and working your way up the nail. Once both colors are dry, use a dotting tool to add shorter lines between each colour to look like shading.
4. Animal Print Ombre: Begin by painting half of your nails with one animal print color. Then alternating between this color and another neutral color for the other half of your nails. Finish off by painting your tips in any final color desired!
13 Ways To Spice Up Ombre Nails
Whether you’re in the mood for an easy ombre nail design or something a little more complex. There are plenty of ways to spruce up your look with this trend. From gradient shades to glitter to wild patterns and even foil stamping, these five tips will help you create the perfect ombre nails!
Tip One: Start With A Base Coat And Add Gradually Sliced Shades
This is one of the easiest ways to get an ombre nail design without too much trouble. Simply start with a base coat and then add progressively sliced shades of color until you reach your desired hue. This also makes it easier to clean up any mistakes that might occur during the application process!
Tip Two: Add Sparkle With Glitter Or Swarovski Crystals
If you’d like to add a little sparkle to your ombre nails, consider adding glitter or Swarovski crystals. These elements can give your nails a beautiful sheen and extra spice.
2) 3D optical effects can be achieved by using coloured gel polish as well as clear gel polish with optically clear additives like pearl powder & titanium dioxide (found at most beauty supply stores) layered over the Entire top hand, including cuticles, which must be the painted with white gel then special effects can be added using airbrush etc.
There are endless ways to spruce up your ombré nails. From coordinating shades to picking out a trendy pattern, these ten tips will help you amp up the cool look for any occasion.
1. Use multiple colors for an ombré effect: Try using two or more colors for a dramatic look that’s perfect for an autumn wedding or special event. Start with your base color and work in a darker, lighter hue until you reach the desired ombré shade.
2. Be creative with your gradient: Instead of using straight lines to create an ombré effect, try a gradient technique! Start with one color at the base of your nail, then gently blend it upward into another color. For an eye-catching gradient, use multiple colors along the length of your nail to get that multicolored look!
3. Coordinate your shades: Pair different shades together to create balance in your design. For example, if you have light pink and light purple on one hand and dark purple and black on the other, mixing and matching these shades will easier to create interesting ombres without getting too lost! And don’t forget about accent nails – try including some fun geometric shapes or hearts in addition to your main shade for extra flair!